
It feels like absolute ages ago since I posted a new recipe, which is about right because the last one dates back to October. I used to post new recipes a lot more frequently, but over the last couple of months, I’ve been leaning more toward baking tried and true old favourites than developing new bakes.
Last week, however, I got the idea for this cake and I wanted to give it a go right away. I’ve recently discovered a love for cardamom, and I think this might be my first-ever recipe with it. It definitely won’t be the last, though! Pairing it with raspberry was a great idea, too, because the tangy flavour of the raspberry perfectly complements the sweetness of the cardamom. The flavours are subtle but delicious.
I decided not to go for a glaze for this cake, but if you wanted to elevate the raspberry flavour even more, you could easily create a beautiful (very pink) glaze using leftover raspberry juice and icing sugar. Speaking of the raspberry juice; during my research into raspberry cakes, I noticed a lot of people use raspberry jam or jelly, but I thought it’d be much nicer to use actual raspberries: you get a stronger, more natural flavour and there’s no extra sugar. That’s why I chose to use strained frozen raspberries – the colour you get from it is amazing, and the taste is really tangy and lovely!
Anyway, enough babbling – let’s move on to the recipe!
You’ll need…
- 125 g butter, softened
- 140 g fine granulated sugar
- 3 eggs
- ½ teaspoon vanilla flavouring
- 50 ml yogurt
- 220 g plain flour
- a pinch of salt
- 2 teaspoons baking powder
- ¾ teaspoon ground cardamom
- 5 tablespoons strained raspberry juice (made from about 125 g frozen raspberries)
- strainer/sieve
- loaf tin
- parchment paper (optional)
- and an oven, of course! This cake needs to be baked at 180 °C (don’t forget to preheat your oven!)
This recipe uses frozen raspberries instead of fresh ones or raspberry jam. Using a small strainer or sieve, you’ll need to separate the juice from the seeds. The juice is what we’ll be using for the cake. It’ll a provide a vibrant pink colour as well as a nice tangy flavour!
So, let’s get baking!
1. Mix butter and sugar Take a large bowl and cream the butter and sugar. This means you mix them together with your electric mixer until pale and fluffy. I used my stand mixer but you can also use an electric hand mixer.
2. Add eggs, vanilla and yogurt Next, add the eggs one by one, mixing them through in between each time using the mixer. Also add the vanilla flavouring and the yogurt.
3. Add dry ingredients Sieve the flour and the baking powder and add them to your wet mixture, along with a pinch of salt. Mix the dry ingredients through the wet mixture using a spatula or the paddle attachment of your stand mixer.
4. Divide batter into two and add raspberry and cardamom Transfer roughly a third of the batter to another bowl. Add the five tablespoons of strained raspberry juice to this bowl and mix through using a spatula. The batter will take on a nice pink colour. Add the ground cardamom to the other bowl (so the one without the raspberry) and mix it through.
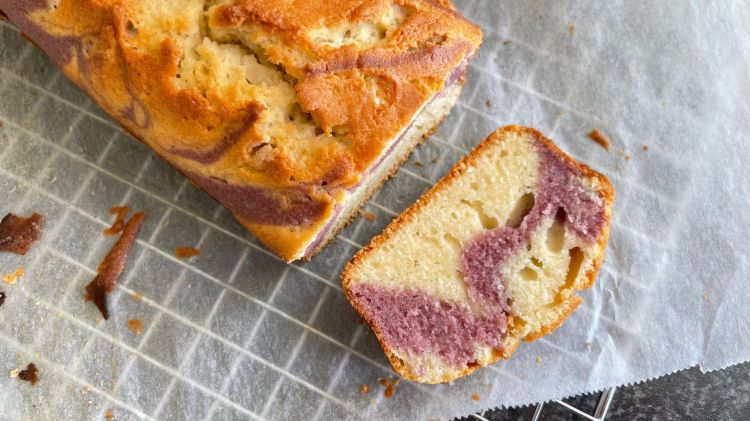
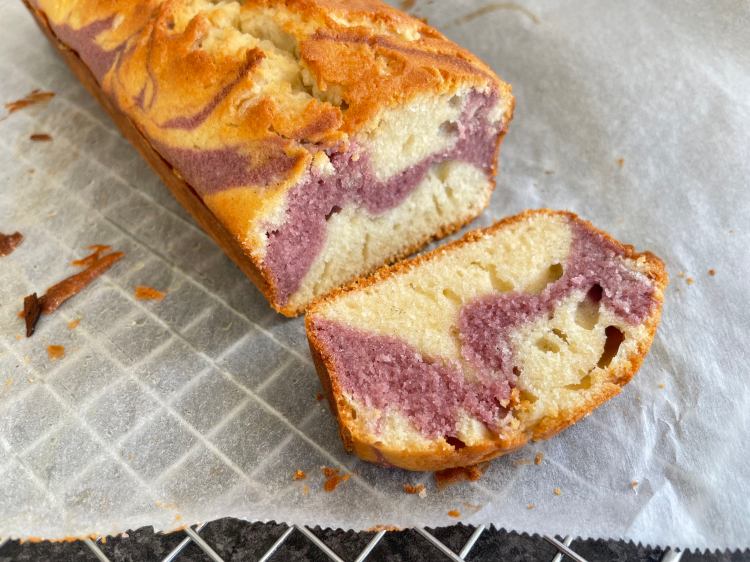
5. Prepare tin Grease the loaf tin and line it with parchment paper. Now take two spoons (one for each batter) and use them to dollop spoonfuls of the mixtures into the tin, alternating between the two batters. Once you’ve used up all of your batter, take a skewer and swirl it around the tin a few times to create a marble effect. Don’t overdo this, or you’ll mix the two different batters together, which isn’t what you want.
You can go about the marble effect in two different ways. I wanted to create a cake with a layer of raspberry in the middle, so I started with a layer of cardamom batter and then added the raspberry on top before finishing with another layer of cardamom, more or less. You can also be a bit more freeform with your marble, though, and just dollop the two batters however you want. I would recommend making sure to layer them on top of each other a little bit, though, so each cake slice has both flavours.
5. Bake! Bake the cake in your preheated oven at 180 °C for 35-40 minutes. Insert a skewer to check whether the cake is done. If it comes out clean, it’s done – if there’s batter stuck to the skewer, it needs an extra couple of minutes. Once it’s done, take the cake out of the oven and let it cool in the tin for 5 minutes before transferring it to a cooling rack.
And that’s it! You’ve got your own delicious Raspberry and Cardamom Marble Cake. Enjoy!

Omg, Yum!
Raspberry and cardamom..mmm…sounds delicious, also I’ve never seen a combination like this!
I’d never tried it before, but raspberry and cardamom turned out to be an amazing combination! 😀
I just discovered cardamom’s gift in a almond-fig torte recipe. I’m in love! Your recipe looks scrumptious and the colors so pleasing to the eye as well! I’ll be trying it very soon. Great post – thank you. 🙂
Isn’t cardamom just the best? I’ve been baking with it quite a lot recently! That almond-fig torte sounds delicious too 🙂 Thanks for your kind comment!