
It was one of my friends’ birthday yesterday and, as I do with most birthday parties these days, I decided to bake something for him. When I asked him what kind of stuff he liked in baked goodies, he said “uhm, something with caramel?” And it went without saying that chocolate would be a hit as well.
Now, I’m not a huge caramel fan (although I’m starting to like it a bit more), so I’ve never baked with it, but this gave me an opportunity to try. However, I didn’t have a whole lot of time, so there was no room for mistakes – and watching a lot of Masterchef and Great British Bake Off has taught me that making caramel from scratch can easily go wrong.
In other words: I needed a short cut. And I found one! It’s a recipe from one of my favourite Dutch baking blogs – Laura’s Bakery (for all you Dutchies – go check it out, it’s cool!). All you need is some butter, dark sugar and condensed milk and you’re good to go. I explain in this recipe how you can make it, but I would definitely recommend checking out her recipe for step by step pictures, even if your Dutch is a bit rusty.
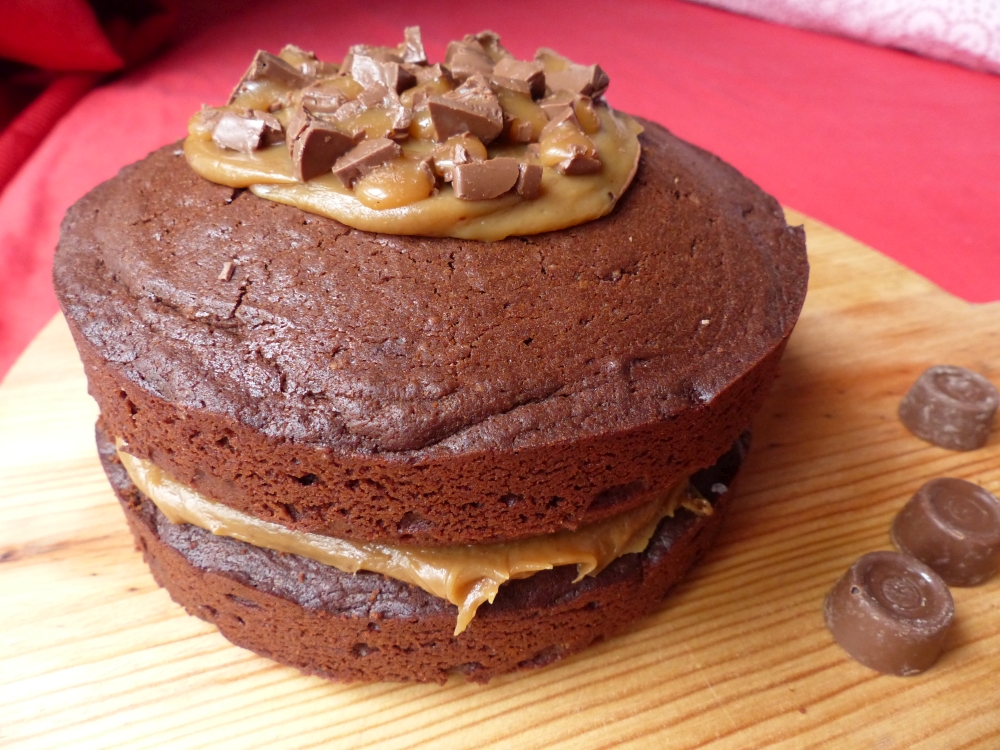
Anyway, this chocolate and caramel cake with sea salt was a big success (I even liked it!) and I’m pretty proud of how it turned out! I baked it in two 16 cm tins (so pretty small) but you can definetely use 18 cm tins as well – it’ll just come out a bit less high.
You’ll need…
For the cake
- 120 g extra dark chocolate (at least 72% cocoa)
- 50 ml whole milk
- 150 g cane sugar
- 150 g soft butter
- 1 teaspoon vanilla flavouring
- 3 eggs
- 200 g plain flour
- 2½ teaspoons baking powder
- a pinch of salt
- 1 tablespoon cocoa powder
For the caramel filling (from Laura’s Bakery)
- 60 g butter
- 4 tablespoons dark brown sugar
- 1 can condensed milk (397 g)
- coarse sea salt (for sprinkling purposes)
The rest
- A few Rolos for decoration (optional)
- 2 springform tins (16 or 18 cm)
- Parchment paper
- And an oven, of course! This cake needs to be baked at 180 °C (don’t forget to preheat your oven!)
So, let’s get baking!
1. Melt chocolate in milk au bain marie style Fill a pan with hot water and put it on the stove, then put the chocolate and the milk in a heat resistant bowl and put that on top of the pan. Once the chocolate has melted, stir it through the milk until it’s evenly mixed. Take the pan with the bowl off the heat, but leave the bowl on top of the pan until you need the chocolate.
2. Mix sugar and butter together Take a large bowl and mix together the softened butter and the cane sugar until it’s nice and fluffy (I used a wooden spoon, you can also use a mixer).
3. Add eggs and vanilla flavouring Add the eggs one by one, mixing them through carefully. Also add the teaspoon of vanilla flavouring and mix it all through again.
4. Add chocolate mixture Now you need to take chocolate/milk mixture and add it to your batter. Again, stir it through until it’s all evenly mixed.
5. Add flour, baking powder, cocoa powder and salt Sieve the flour, baking powder and cocoa powder and then add it to your batter. Also a pinch of salt (that helps enhance the flavour of the cake – I put it in almost all of my baked goodies). Fold all the dry ingredients through the mixture, but don’t mix it too vigorously: be gentle!
 6. Divide batter over (greased and lined) tins Grease your springform tins and line them with parchment paper and then divide the batter over the tins. To make sure both tins have pretty much the same amount of batter in them, I always divide the batter by placing one spoonful in one tin and then a spoonful in the other, etc.
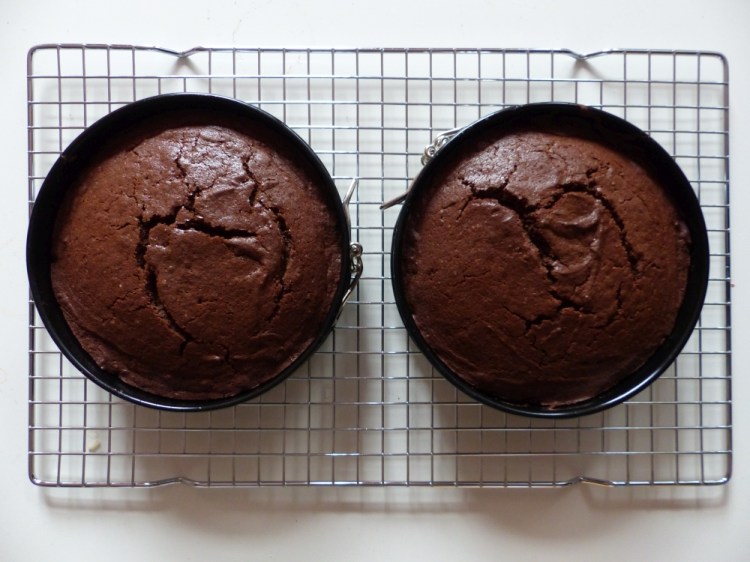
7. Bake the cakes! Put the two tins into your oven and bake the cakes for about 35 minutes at 180 °C. Check whether or not the cakes are done by inserting a skewer in the middle. If it comes out clean, your cakes are done! Take them out of the oven and let them cool in their tins for about 5 to 10 minutes before taking them out of their tins and letting them cool down completely on a cooling rack.
8. Make the caramel filling While your cakes are cooling down, you can prepare the caramel. Like I said, it’s really easy. The one you need to keep in mind is to keep stirring! Melt your butter in a saucepan on the stove on low fire. Once it’s melted, add the 4 tablespoons of dark sugar and stir it through until it’s more or less mixed. Then, add the condensed milk.
Now you have to keep stirring, and make sure the sugar doesn’t get stuck to the bottom and burns (that happened with mine a little bit). The mixture will start to boil (keep stirring!) and thicken. Just keep stirring until it’s thick enough (it’ll get less liquid when it cools too). For step by step photos, check out the recipe on Laura’s Bakery. It’s in Dutch, but the photos speak for themselves.
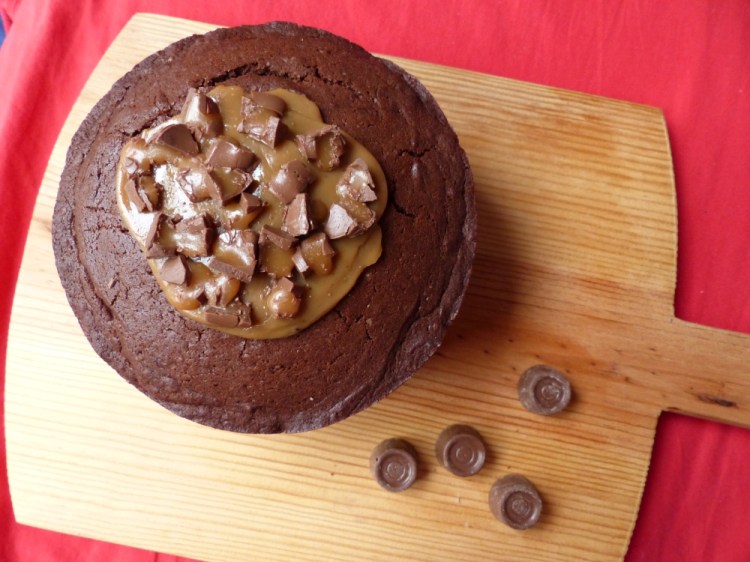
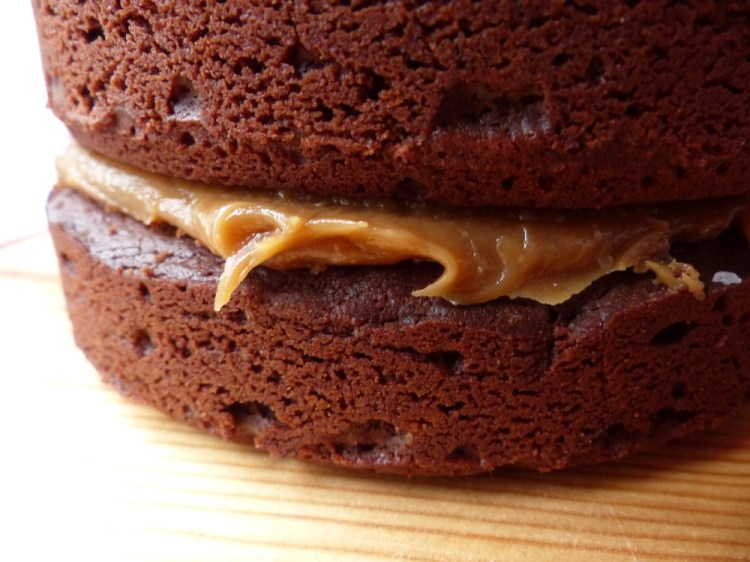
9. Spread filling over cake and sprinkle with sea salt Use a knife to carefully slice of the dome of one of the two cakes so that it’ll be flat. Then, spread the caramel filling over that same flat cake, spreading it nice and evenly. Do make sure you have some caramel left over for the top. Sprinkle some coarse sea salt over the filling – make sure you don’t add too much, because you don’t want your cake to taste too salty.
10. Place second cake on top and decorate Take the second cake and place it on top of the filling. Press it down gently. Then, take some of the leftover caramel filling and spread it over the top in whichever way you like. I didn’t spread it out completely, but you could of course totally do that. I added some cut up Rolos on top for decoration, but that’s optional too.
And there you have it! A chocolate caramel cake with sea salt – enjoy!


I am definitely trying this over the summer. It sounds delicious!
Thanks, Cathy! 😀
This looks AMAZING!
Thank you, Jolien! 😀 I’m very happy with how it turned out!
Looks amazing
Thanks!
I already told you on twitter how much I want to make this (and eat it!) but I really really do! And I love that you provided up close pictures and specific instructions, that helps a lot. I love caramel and chocolate cake is sometimes too rich for me so this looks like a good compromise. Yay Great British Bake Off! 🙂
Aw, thanks so much, Morgan! Not much can go wrong with this recipe (as long as you remember to keep stirring the caramel 😉 ) so I think you’ll have fun with it! Let me know how it turned out 🙂 And yay GBBO indeed!
This looks delicious! Caramel CAN easily go wrong and has done so in my recipes many times. But I’ve finally crafted the perfect caramel slice and I feel so accomplished haha.
Thanks, Emily! 😀 And wow, I’m impressed! I do want to try to make caramel from scratch some time, but I’ll try when there’s no time pressure, haha. 🙂
Reblogged this on Chef Ceaser.
This looks delicious!!! Yumm!!!
Thank you! 😀
this looks so delicious! 🙂
Thank you! 😀